


Have You Tried? Investigating Revit features and workflows.
Have You Tried? Investigating Revit features and workflows.
Have you tried
Hi, I’m Jeff Hanson, Senior Content Experience Designer at Autodesk. In this series Have You Tried, I profile a useful feature or workflow in Revit here on the Revit blog, and link to a more in-depth, step-by-step walkthrough of it on the Revit Product Help. I look across what’s new, what’s been around for a while, what maybe you didn’t already know, and find things that can make quality of life for working in Revit better, while making you more productive.If you have a question or something I should try, leave it in the comments.
Grids in 3D Views
Revit 2022 brought us the ability to display grids in 3D views. Your upgraded projects will not display grids in 3D by default, but you can turn them on if you like. A project started from a default template in 2022 will display grids on Level 1.
3D grids are useful for troubleshooting grid visibility issues in other views. You can easily see the 3D extents of a selected grid. 3D grids are of course useful in documentation. Turning on grids in a 3D view can help locate a portion of a design you want to show in more detail, but might be out of context with the rest of the building. The grids in the 3D view can quickly identify where this view is in the greater context. The most recent Have You tried topic looks at how you turn on the visibility of grids in a 3D view. The topic gives a few examples of how you might use 3D grids in your workflows. If you want to know more, look at the most recent Have You Tried topic. Have You Tried – Grids in 3D Views.
Railing Extensions
In architectural design, stairs and railings can be complex to design and detail. In many cases, the way a default railing in Revit is modeled may not meet code requirements. Railing extensions in Revit give you the ability to extend a railing past the sketched end point, making it possible to meet code requirements.
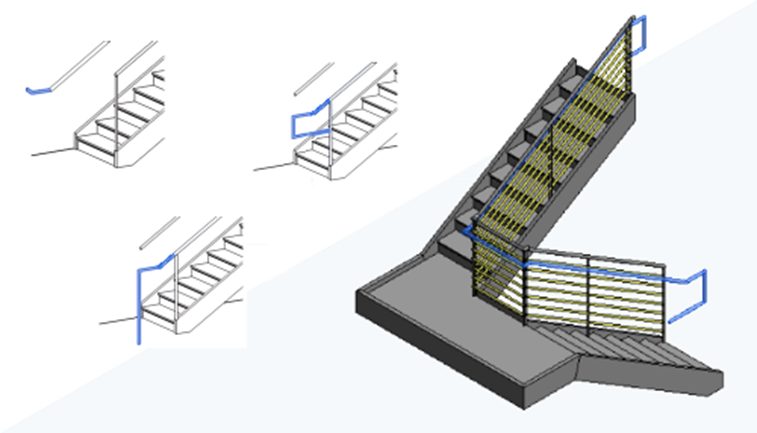
You can select from standard extensions or use a sketch to create your own extension. Railing extensions are applied directly to top rails and handrails of a railing type. Because you need to specifically select the continuous rails, railing extensions are not easy to find in the Revit UI while working. If you want to know more, take a look at Have You Tried – Railing Extensions.
Keynoting
Back in the days of hand drafting — yes, I am that old! — we used to speed annotation along through the use of keynotes. It involved noting drawings with numbers, rather than text, and then adding a legend to the sheet that would have the text description associated with the numbers used on the labels. This made it easy to do all the hand lettering in one place. It could be a bit confusing because you needed match up the number with the text which could lead to errors.
Once CAD came around, placing text on drawings became much easier, so keynoting was not used as frequently.
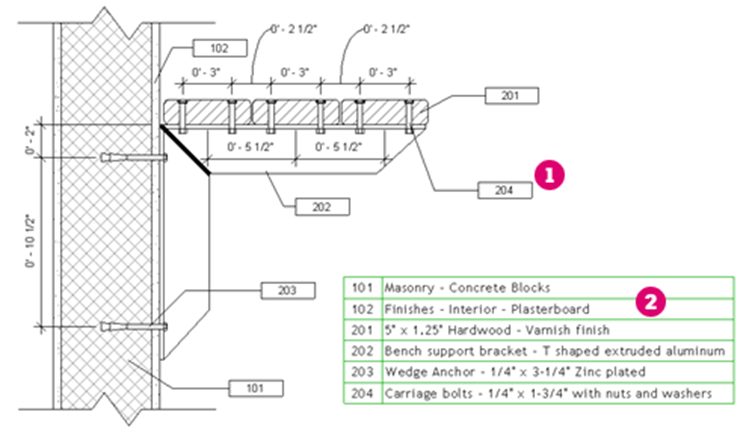
Now in Revit, data can be associated directly with an element and then a tag can pull out and display the information. This gives us an opportunity to look at keynoting again. The keynote information is attached directly to families in your model and then the keynote tag pulls this information in annotated views. It does take some initial setup, but once in place, it can really increase your speed when annotating your model. Look at the most recent Have You Tried – Keynoting article, now up on the Autodesk Knowledge Network.
Shared Views
When you work with an extended team, getting timely feedback can be important, but sometimes difficult. Shared Views in Revit can be used to help with this workflow. It is especially useful if the extended team does not have access to review the model directly in Revit. Instead, with a shared view, they can use the Autodesk Viewer to view and comment on a model in any browser on any device. You create the shard view and simply share a link with your extended team.
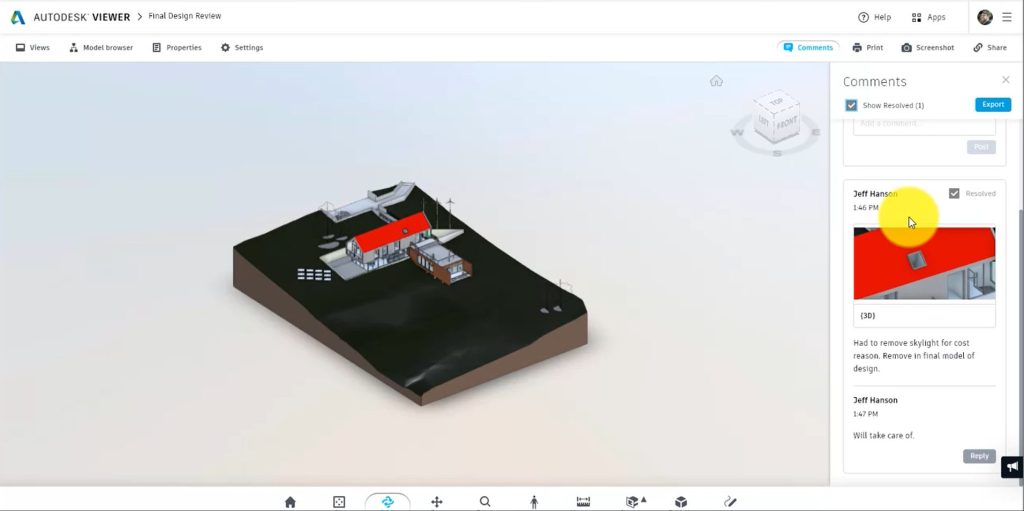
As an example, over the Christmas holiday I was talking with my nephew who wanted to do an addition to his house. I told him I could work out some ideas for him to look at. He does not have Revit and he lives far away — Shared Views to the rescue! I worked up a couple of ideas for him sent the link. He was viewing on his phone minutes later
What can you do with Shared Views? Learn more about what’s possible in my latest article, Have You Tried – Shared Views.
Laying Out Sheets with Generative Design in Revit
Is manually laying out sheets your favorite Revit activity? If so, this post is not for you.
In our new installment of Have You Tried, we introduce a way to automate sheet layout with Generative Design in Revit. We walk you through simple steps to load the study type, select a sheet, and explore multiple options for sheet layout.
Not a Dynamo guru? No worries—this process uses a prebuilt graph/study type. You can download it in the article, adapted from John Pierson’s recent post for the Dynamo blog. Follow the steps with a sample model, and then try using the study type to make sheet layout smoother in your own projects.
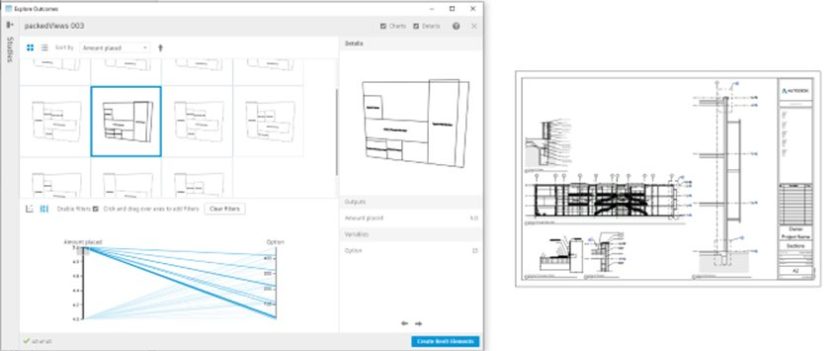
Check out Laying Out Sheets with Generative Design in Revit, and get ready to leave manual sheet layout in the past.
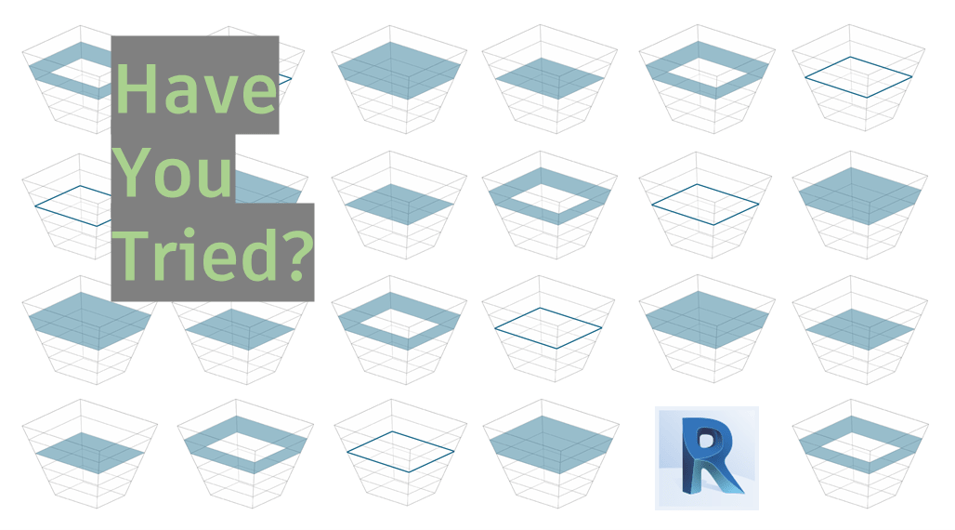
Curtain Wall Editing
Curtain walls are a part of almost every project. The curtain wall tool in Revit gives you powerful tools to create curtain walls. To get the most out of curtain walls in your projects you need to know how to edit them. Review our latest Have You tried article where we teach you about the primary components that make up a curtain wall and show you how to control each part.

Get the most out of curtain wall editing tools in Revit and learn to create complex curtain wall systems in your projects. Check out our most recent article, Have You Tried – Curtain Wall Editing.
Shared Parameters in Key Schedules
Remember the slogan “Two great tastes that taste great together”? It was for Reese’s Peanut Butter Cups several years ago — but perhaps I am dating myself?
In this installment of Revit Have You Tried, we’re talking two tasty pieces of Revit 2022 that come together to save you time and keystrokes: shared parameters in key schedules. Both shared parameters and key schedules have been around for a long time individually in Revit, and both are extremely useful in planning project data and updating progress sets and deliverables. What can you do now that they are brought together?
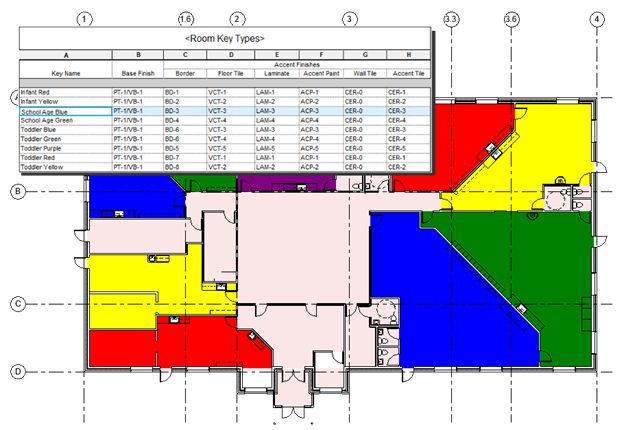
Check outHave You Tried – Shared Parameters in Key Schedules for two examples of this new feature in action, and let me know if you give it a shot in the comments.
Custom Revision Numbering
Prior to Revit 2022 when using the revision tools, you could choose between and alphanumeric sequence or a numeric sequence. There was some ability to customize the sequences with prefixes and suffixes, but in most cases the tool did not offer enough flexibility to meet some of the more complex standard for revision sequencing. You needed to utilize other parameters or not use the revision system at all to meet project requirements.
In the 2022 release all of that changed and the revision tool received an enhancement allowing you to make custom sequences and create as many different sequences as you require for your project. With these enhancements most needs can be met.
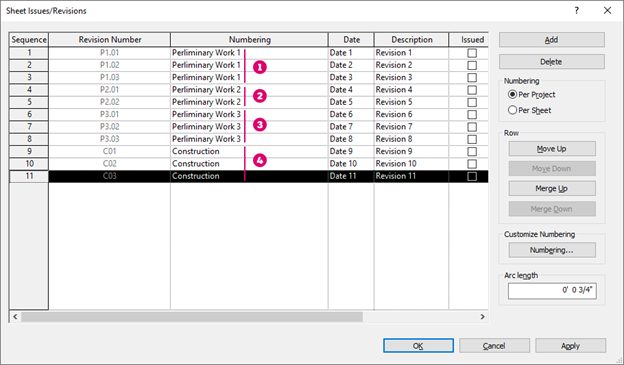
In our most recent Have You Tried article we look at the enhancements to the revision tool and show you where you can find them. The article illustrates how you might create a few custom revision sequences to meet the specific requirements of a project. Have You Tried – Custom Revision Numbering?
Global Parameters
Have you ever wanted to create a parametric relationship between elements in a project but found it difficult? Maybe global parameters can help you. Global parameters were introduced in Revit 2017, they give you a way to build parametric relationships in projects in a similar way you would in families. We could always build a constraint for a dimension in a project, or make things equally spaced, but what if you need to make things equal, but a specific value, or the equal condition exists on two ends rather than across the whole dimension? This is where global parameters can be of use. You can also assign a global parameter to replace a type or instance value in families loaded into your project.
You create a parameter value that is applied across multiple families or different places in your project. Then control that parameter value from one dialog affecting everywhere you have applied the parameter in the project. For example, in the image, one global parameter for cabinet material has been assigned to 16 different families with 32 parameters (one for the doors and one for the cabinet material in each family). Once assigned all 32 parameters are changed when the one global parameter value is changed.
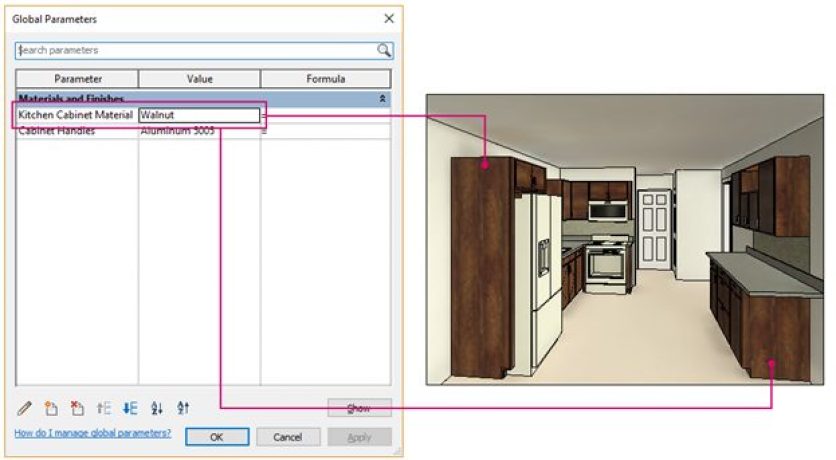
The most recent Have You Tried topic provides additional examples of how you can start utilizing global parameters in your work. If you have not tried them yet, or have not looked recently, read through the Have You Tried topic and maybe you will find some ways to incorporate global parameters in your projects. Have You Tried – Global Parameters.
Load Autodesk Family
Autodesk provides sample content for use in your Revit projects. There is a wide range of families to use. Starting in Revit 2021 we created a tool to help you find and load this sample content. Load Autodesk Family is a dedicated browser that opens from within Revit and opens a cloud repository of all of Autodesk’s sample content for Revit. Without the need to install and load content pack onto your local computer or network, you can find sample content across languages and regions.
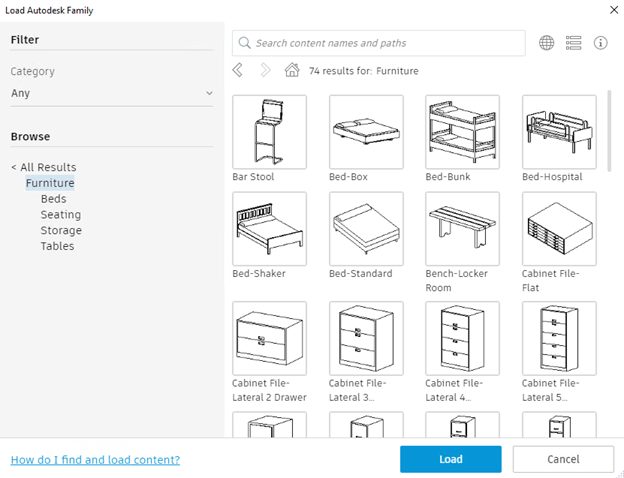
Because it is a cloud repository, the content is updated regularly by Autodesk so you can be sure you are accessing the most up to date content. The most recent Have You Tried Article show you how to access this tool and find the sample content you are looking for without any additional installations. Look at the article and see how you can use sample content in your projects: Have You Tried – Load Autodesk Family.
Schedule Formatting
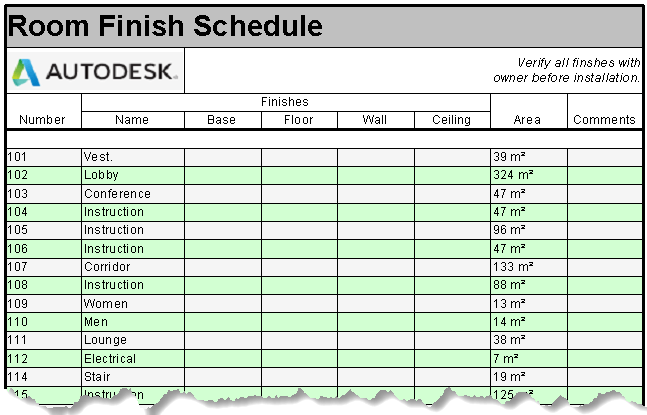
Default schedules in Revit get the job done and will never miss a beat in capturing information and making sure it stays coordinated. I am old enough to remember working on non-Revit projects having to coordinate all the information manually. Those are hours I am never going to get back.
Schedule formatting tools in Revit can take that automated and coordinated schedule to the next level. Formatting gives you control over the appearance of the schedule helping you communicate the information. You will control both headers and data rows in the schedule to match your project requirements. With a little work on schedule formatting in your office templates, you can have great looking schedules with fully coordinated information.
If you have not tried schedule formatting tools, this edition of “Have You Tried” might be worth a look. Even if you have tried these tools in the past maybe it is time to take another look at them? Stop by the topic and let us know what you think. Have You Tried – Schedule Formatting.
Custom Line Styles in Revit
Line styles in Revit are used to control how different elements are represented in your projects. Line styles are used by system elements like area boundaries or sketch lines. If you want to customize how these kinds of elements are displayed, you need to customize line styles. Line styles are also used when drafting in Revit. Annotation lines are drawn with la line style. You can use default line styles but can also include custom line styles as part of your template. Including custom line styles makes your drafting line consistent across your projects.
Line styles are used to change individual lines of model elements. Use them to enhance the graphics of elements in views of your model. The linework tool allows you to apply a custom line style to a line of a model elements.
Line styles give you control over line weight, line color, and line patterns used in your projects. Learn how to add custom line styles to your Revit projects and make your views look just the way you want them too, visit this month’s Have You Tried – Custom Line Styles topic.
View Templates in Revit

What does working in Revit have in common with luxury real estate? Well, it’s all about the views. In this month’s Have You Tried, I’m taking a closer look at view templates and how you can use them to be more productive and have a better experience working in Revit.
We all want to get our work done faster and more consistently and view templates are key to doing this in Revit. View Templates are not a new feature, but if you have never used them, you might want to take a closer look. A view template allows you to pre-define the aspects of a view in Revit. Then with one click you apply the view template to a view. The template is then in control of the view. You no longer need to apply visibility and graphic overrides or phase filters manually. Spend time developing the view templates for different kinds of views you typically use and then apply them with a click.
View templates can also be applied to view types so when a new view is created, the correct view template is automatically applied to the view.
If you want to make you view more consistent and better cover all the angles of your model, visit thismonth’sHave You Tried – View Templates topic.
Route Analysis and the People Flow Toolkit

In September, we released the People Flow Toolkit as a Revit Technology Preview. I’ve been using the expanded Path of Travel capabilities in Revit to automate egress and ingress calculations to evaluate my designs, and with People Flow, there is now greater sophistication and smarts built-in to automating route analysis. You can use these tools to quickly get an idea of the shortest path to an entrance or exit, take into account obstacles and buffers, define one-way corridors, and re-route without having to make a single manual calculation.
This month’s Have You Tried article shows examples of how to use path of travel tools in three common scenarios you might encounter when doing an exit analysis.
- Travel Distance Limit – Travel distance to the nearest exit.
- Dead End Limit – Length of a corridor with no exit.
- Common Path Limit – The portion of the exit access that must be traversed before two separate and distinct paths are available for exiting.
Visit the article Have You Tried – Route Analysis for more information. And check-out my colleague Harlan Brumm’s recorded YouTube Live demo for a fun example of the tool in action — in this case, laying out a voting site to align with safe-distancing protocols.
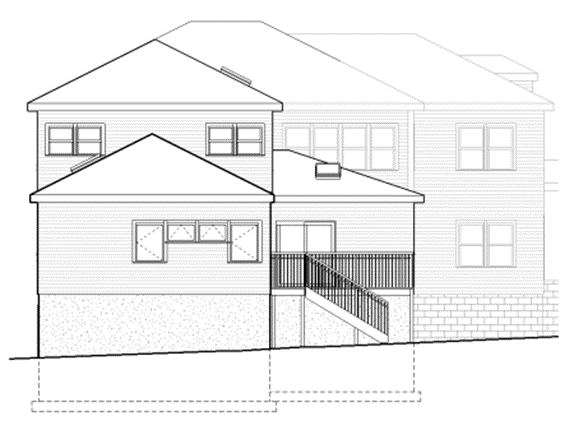
Conceptual Design with FormIt Pro and Revit
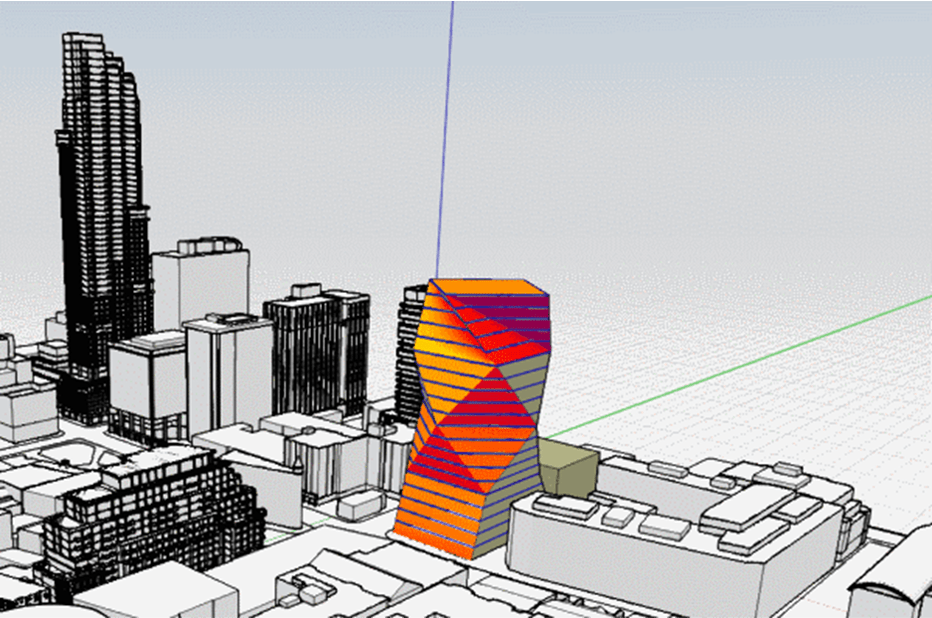
In the early stages of a project,you might not be readyto think aboutdetailed elements like walls, windows and doors. You just need to work outthemajor relationships in your design,likeconnectionto the site andlocation.Conceptual designtools—Massing in Revit andFormItProin the AEC Collection — allow you to quickly establish design conceptsfor design development.Keep on reading for my take on the advantages of each, or pop directly over to my new Have You Tried topic in Revit Product Help, for a more in-depth look at your options in early-stage design.
How to choose?
3DModelstudiesin Revit andFormItPro areeffectivewaystoapproach early-stage design.Bothproductsofferdistinctive palettes ofsketching, massing, andmodeling tools. They both develop geometry withanalytical properties,meaning you cansketchfor style and back itupwithdesign data,which helps you communicate better with your collaborators and be more persuasive in your review sessions.FormIt Proand Revit tabulate volumetric and dimensional data,butthey’llalsohelp you seehow your model stacks up for solar and energy performance, too, with integration into Insight in the AEC Collection.
Revit is great for creating design formulas
Maybe it’s the case that youalreadylikeusing Revit in early-stage designand are familiar with the tools, environment, and the difference between in-place modeling and mass families.The logic of tweakingparametersfor your Mass Families is apowerfulway to evenly apply the standards and style for your firm or practice to the complexity a site or set of design requirements can throw at you. It does require some skill in family creationto get the most out of this approach. The“By-Face” tools in Revit,whichletyou easilybreakdownabstractmasses into components like walls, floors, roofs, or curtain systems, transform your 3D sketches into building systems quickly, smoothing the way into design development.
FormIt Pro can get the form making juices flowing
If you likea more tactileapproach, youwillenjoyFormItProforthefocus on form-making.The clarity and control ofusing your cursoror stylustomove a concept allthe way up to LOD-300can free-up your creativity, and you can appreciatetheuncomplicated UI and spacious feel, andthe ease with which you can hover, revolve, rotate, or fly through yourmodel.FormItdoesn’t offer the samedetailedparametric family creationcapabilityas Revit, but you can createcustom content inFormItand import itinto Revit asa Revit Family.Both Revit andFormIthave tools for push and pull extrusion, creating voids,and finer tools foredging, but onlyFormItworks across platforms: PC,Web App,andiPadtablet, making itperhaps more amenable to your creative process,andopen tomore diversity inpreferred waysofworking– at the site, coffee with a client, or wherever design may take you.
Better Together
If you decide to try out these two tools for early-stage design, the question you mightask yourself is notwhichtoolyou prefer, butwhen.FormItProoffers asketchbookto design calcsexperience.Backed by real design data, it canhelp youwin a pitch with an informed sense of how you’re meeting the requirements for a project, all without a huge investment of time.TheFormItConverter in Revit, improved with Revit 2021.1,transfers models fromFormItProintoRevit,so you really can start with a3Dsketch inFormItand move into Revitfor developmentwithout much fuss.Now, if you already have a library of massing families in Revit, andifyour early-stage design processesare driven more byananalytical approachthan free-hand massingcan provide, Revitcould beyour single software solution from early-stage design on through to documentation.
For more on trying outthese two tools for early-stage design, visittheHave You Triedtopic and letusknow in the comments ifyou have a preferred tool and approach.
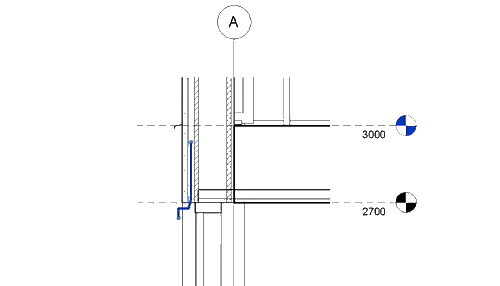
PDF and Image Linking
In Revit 2021, the ability to link PDF and image files was introduced. In prior releases importing PDF and images was possible andnow you can link these files instead. The ability to link these files lets you keep documents up to date and manage changes toPDF files and images muchmoreeasily. When linked, the newest version of the linked file isautomaticallyupdated every time you open your Revit project, oryoucanmanually updatewhen the linked files are changed.
Linked PDFs can be snappedto,allowing you to use them as an underlay to coordinate and author elementsin your Revit model.Usethose sets of existing documentsto develop your Revit model even faster than before.Visit the HaveYou Tried on the Autodesk Knowledge Network to learn more about linking PDF within Revit models.
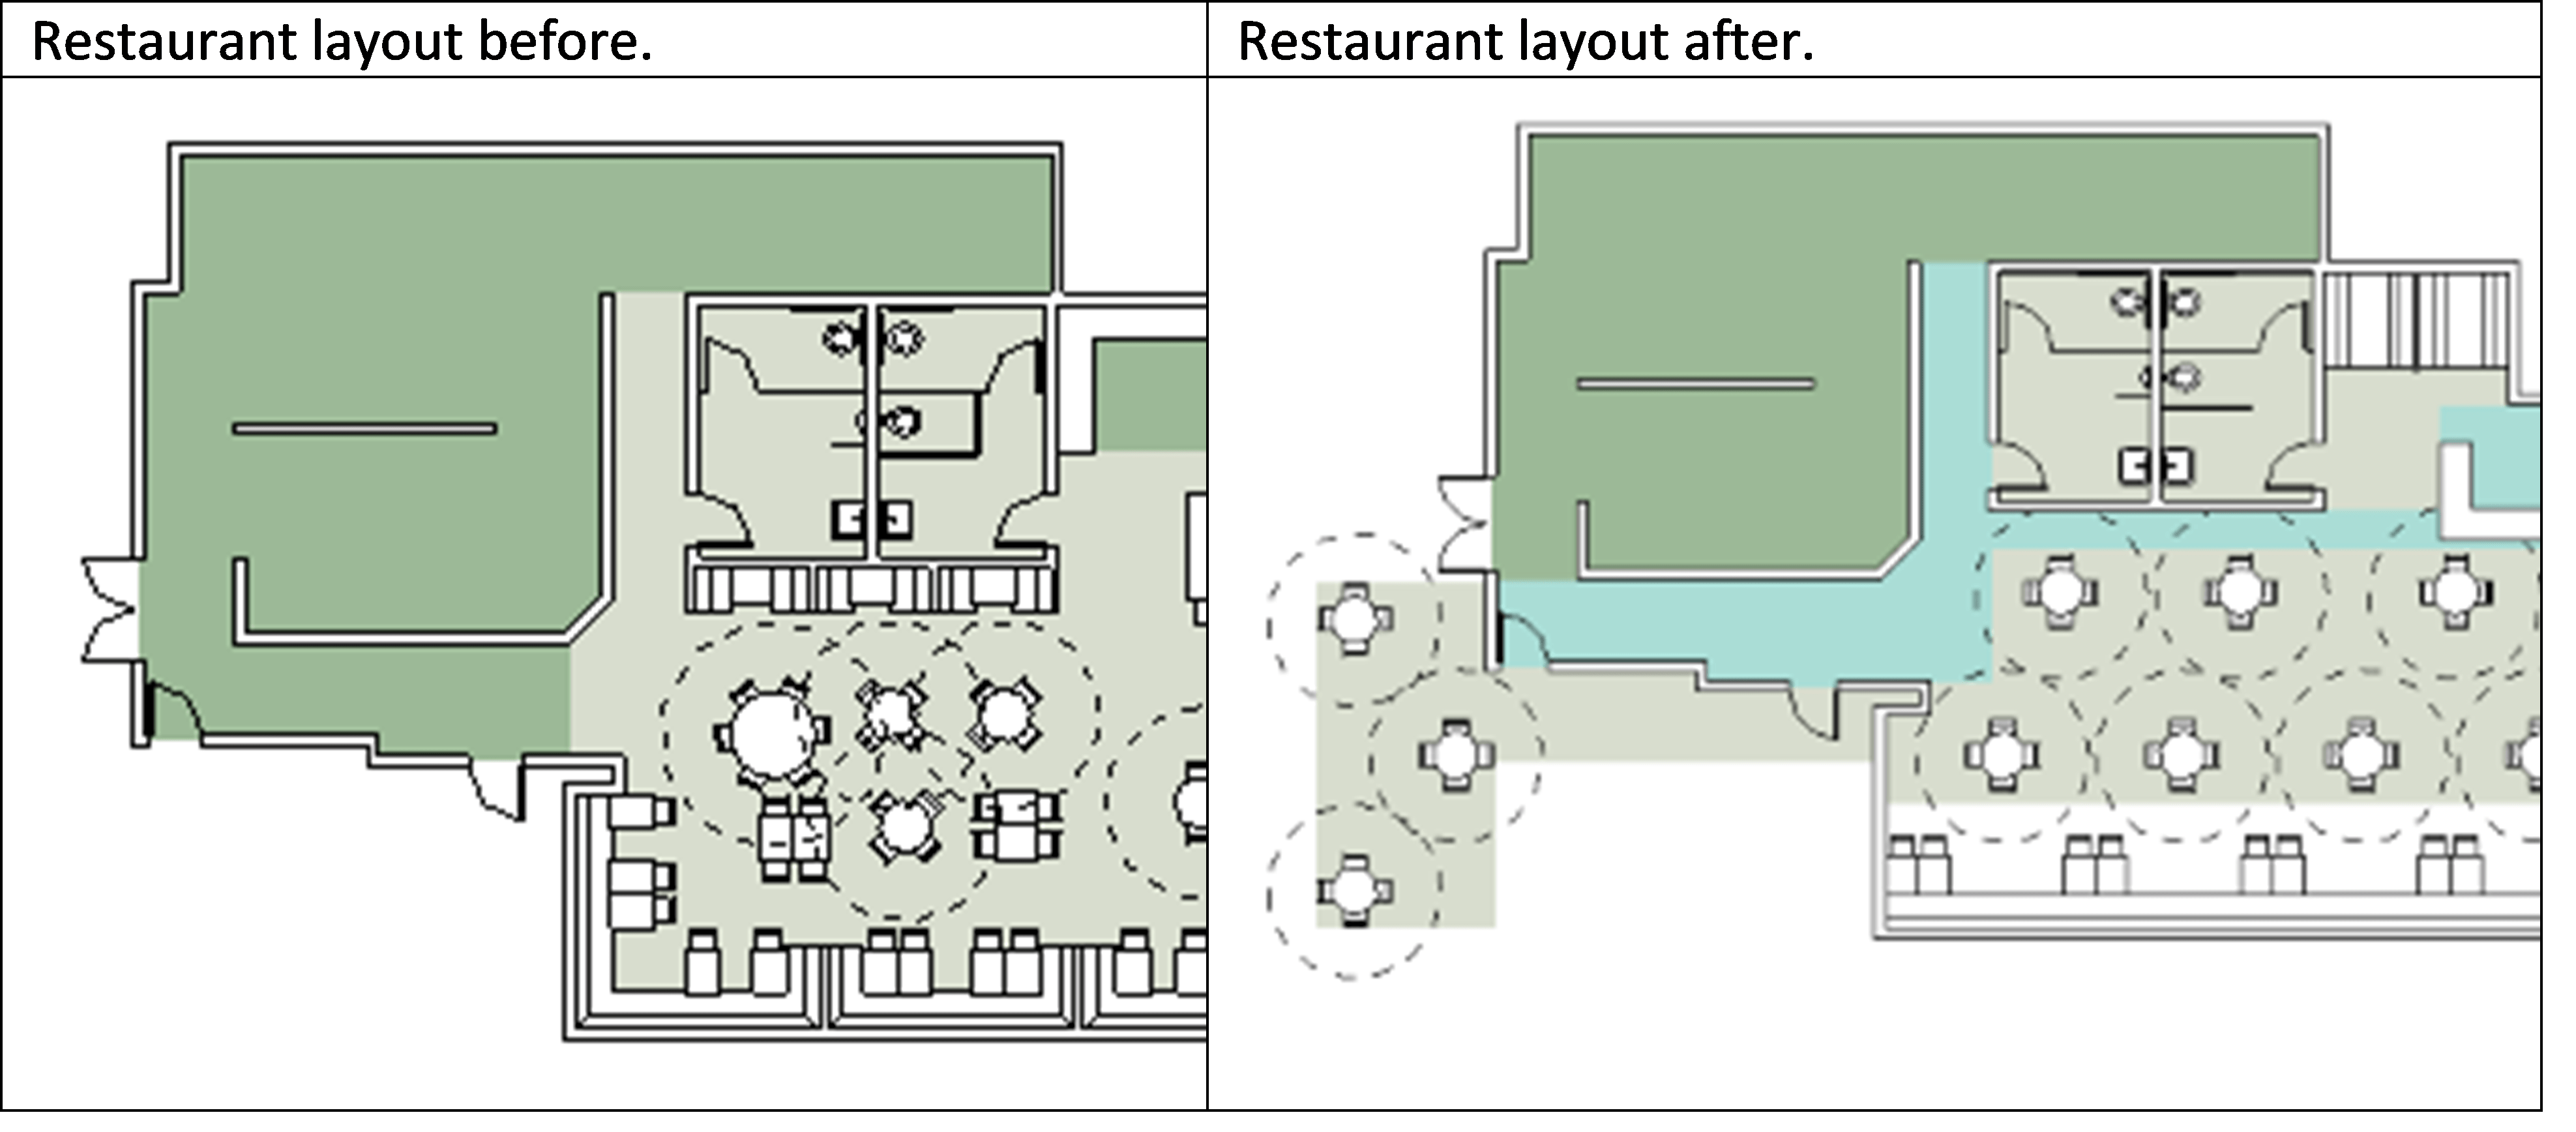
Generative Design in Revit
Revit 2021 introduced generative design tools to Revit. These tools can automate the execution of generative design studies in an iterative way. You can focus your attention on other areas of your model while Generative Design runs in the background. Then you filter the results of the generative design study to find the outcomes that match your goals.
In the Have You Tried topic covering Generative Design, we examine how to use generative design techniques to help redesign the layout of a restaurant to meet physical distancing guidelines published by the MASS Design Group. In the case study, Generative Design in Revit is applied to the small space in order to see multiple options for table layout. A layout is selected based on criteria for the design and the layout is applied to the space. To achieve an optimal layout selected tables are adjusted for the specifics of the space.
Further analysis with the Path of Travel tool, shown below, allows you to understand both movement through the space and which tables are most exposed to passing traffic.
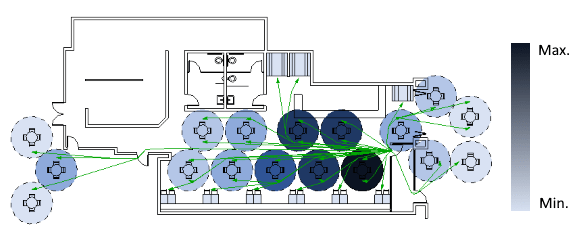
Even small projects can see benefits from generative design techniques.Do you have a project that could benefit from generative design? Head over to the Have You Tried: Generative Design topic in the Revit Product Help to learn more about Generative Design in Revit and how it can assist you in meeting your design goals.
For more on using Autodesk products to support getting back to work, check out how we’re helping AEC professionals return to and reimagine the built environment.
Real-Time Realistic Views
In Revit 2021 there was a change to the “realistic” visual style. In previous versions of Revit, realistic visual style applied material appearances to elements in your model. In 2021, real-time realistic views applies material appearances and lighting effects to the view as you move through the model. At it’s core, realistic view style applies real time rendering to a view. Rather than waiting for a view to render, you can now set the visual style to “realistic”.
This is a great tool for presentations, allowing you to walk project stakeholders through your design in real time. Realistic views can also be used in plans and elevations to give a greater sense of realism and material quality in your presentations.
If you have not yet tried realistic visual style in Revit 2021, head over to the Have You Tried topicin the Revit Product Help to learn more about it.
___
Like trying things? We want to hear from you. We’re launching the ‘Have You Tried’ series in product help to profile new features and workflows. Let us know what you think and make suggestions for articles here:
Revit Help: Have You Tried